

iPhone 14 Pro camera tips and how to’s
Smartphone cameras have come a long way — from early 256-color grainy postage stamp-sized GIFs to the megapixels of today. And though you might be unsure if your current phone can compete with top-level DSLRs and dedicated point-and-shoot products, I’m here to tell you that the upgraded cameras on Apple’s newest 14 Pro and Pro Max may finally be the only camera you’ll ever need.
True, a talented photographer can make a compelling image from a shoebox camera. But as someone who has worked extensively with iPhone cameras and DSLRs over the years, this is the first phone camera that enables me to take great pictures, not just great phone pictures.
It’s obvious Apple has been going in this direction for a while. The iPhone 12 Pro and 13 Pro lines already had excellent cameras, but the 14 Pro line goes even farther. It sports a second-generation optical image stabilization system for clearer pictures when your hands are moving, four optical zoom levels and most importantly, the image sensor is now significantly larger, which is key to many advances the camera boasts.
All these enhancements mean that right away, your pictures will likely be clearer, and have more detail and better depth of field. But photographers will tell you that more megapixels does not equal stunning photos. Nothing will substitute for a good eye for composition and a compelling subject.
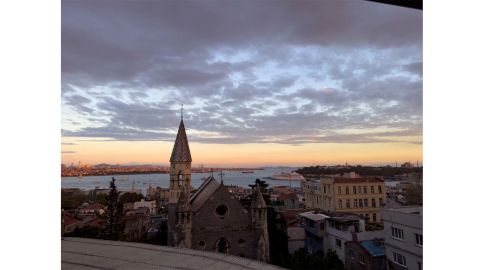
But I took the iPhone 14 Pro Max to Turkey in October and captured shots that looked stunning, both on the phone and even better after I edited them. Want to get all you can out of your new iPhone 14 Pro’s camera? Here are the photography tips and tricks you need to know before you start shooting.
As previously suggested, you can always start shooting great images right out of the box with the iPhone 14 Pro’s new Photonic Engine. Not only will you get richer, darker colors, sharper details and boosted brightness, but the 2X zoom yields macro pictures with almost no loss in quality. Add to that the still fantastic Night Mode, which now captures images even quicker, and the new filters under Portrait Mode, and you can certainly boost your JPEG photos with ease.
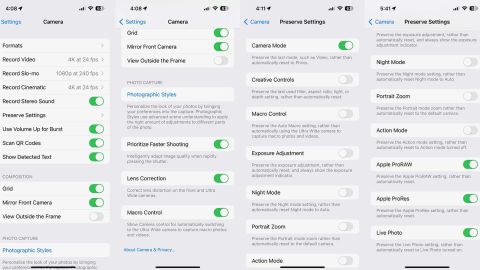
But, if you’re interested in really pumping up your photo skills, the first thing you’ll want to do is dive into your camera settings in the main Settings app. To get the most out of your iPhone 14 Pro, you want to set it up to capture absolutely as much data as it can, and you will do that by maxing out your image settings. More data means more information about the scene being captured, and the way to do that is to shoot in a professional format photographers call RAW. (Apple has their own version of RAW called Apple ProRAW and Apple ProRes for video; while there are technical differences in the various flavors of RAW, they’re not that important.)
To do this, go into your phone’s main Settings, choose Camera, and then tap into Formats. From there, you’ll want to turn on Apple ProRAW and Apple ProRes. There’s a secondary setting under ProRAW where you can choose the resolution. Choose the 48 megapixels setting for the absolute largest image sizes you can capture.


What’s so special about Apple ProRAW? ProRAW and ProRes files contain unprocessed data from the phone’s image sensor, which means that they retain all of the information that was captured by the camera when the photo was taken. This is key when you’re editing photos, as it allows for more flexibility in adjusting white balance, exposure, and other elements of the photo. Shooting in JPEG, on the other hand, discards a lot of that data to compress the image file.
The drawbacks to RAW? The files are enormous. The unedited ProRAW file above is almost 60MB. The edited jpeg file is 9.1MB. That may not sound like much if you have a 128GB phone (the smallest iPhone 14 Pro that Apple makes), but if you are serious about photography, you could have tens of thousands of photos in your library. And all those will take up a lot of space on your phone.
There are several ways to get around this. One, if you haven’t upgraded your phone yet, get the 14 Pro with the biggest storage capacity you can afford (the 14 Pro goes up to 1TB of storage, if you’ve got $1,600 to spend). If you’ve already gotten a new phone, but worry about running out of space, you can buy more space online and let the phone offload the photos up into the cloud if you’re an iCloud subscriber. This is what I do. Three, if you’re invested in Google Photos, you can store your photos there, similar to iCloud. Finally, you can offload the larger photos to a Mac or Windows machine using either of the methods described here.
Next, you’ll want to make sure the camera is set to shoot at a moment’s notice. No one wants to miss a shot because you’re fiddling with settings. So go back into the Camera settings and set them to the below if you want the best image quality for photos and videos. I like to shoot video at 24 frames per second, since that emulates a cinema film look, but you can set it to 30 or 60 fps depending on your preference for how you want your videos to look. (60 fps will give you a smoother, “soap opera” look, while 30 is a bit in between.) See the photo below.
Related: The best iPhone camera lenses you can buy
You can pick a personal “photographic style” here if you like, which will give all your photos a consistent look. You can choose standard, rich content, vibrant, warm, and cool, but bear in mind it won’t be applied if you’re shooting Apple ProRAW format — just in your basic JPEG shots.
Prioritize Faster Shooting, Lens Correction, and Macro Control are all fairly well explained in the settings. I recommend turning them on. Macro Control allows you to get very close to a small subject, like an insect or small toy. This setting will automatically turn this on if you’re very close to a subject and shooting with anything other than the ultra-wide 0.5x zoom. A small icon will show up on the screen of the camera app to let you know when you’re in Macro mode or not.
Then you’ll want to make sure your camera settings aren’t jumping around. Often, once you’re done taking a picture and put your phone away, it will reset the camera settings. This is annoying if you want to keep shooting video all afternoon, and the phone keeps reverting to a still camera mode every time you put it in your pocket. Preserve Settings allows you to “freeze” the set up of the phone’s camera in between sessions. I have them set up as below, as I like to keep the camera in whatever mode I was shooting in — video, slow motion, still image, etc. — but giving me the most flexibility when I’m out and about. There are several examples of how to use this. If you’re shooting your kid’s birthday party inside in consistent light, you might want to keep it in video mode and preserve the exposure adjustment so you don’t have to keep changing that setting while running after a horde of children. Or you might want to keep night mode and exposure adjustment on if you’re sitting around a campfire at night and want to make sure all your shots look consistent.
Now that the phone is properly set up, you’re ready to take some photos. Though this may seem like a no-brainer, there are several ways to do this, and you should experiment to see which way you prefer.
You can tap the shutter button on the camera screen, of course, and many people already know that you can also use the volume buttons as a shutter button. But in addition to just snapping a single picture, if you tap and hold the shutter button on the screen, it will record video. And, if you hold and slide it to the right, it will lock on recording video, so you don’t have to hold down the button.
If you tap and slide to the left, however, it will take a burst of photos for as long as you hold the button. You’ll see a counter in the shutter button circle to tell you how many photos you’ve taken in that burst.
You can adjust the exposure of the photo by tapping the screen and sliding your finger up and down to adjust the exposure. Pro hint: if you’re shooting a scene with a lot of shadows and bright sky and you’re shooting with Apple ProRAW at 48 megapixels, expose for the sky. It will look very dark, but there’s a lot of detail you can pull out of the shadows when you edit the photos later (see below).
You can lock the exposure and focus of the camera by tapping and holding where you want to focus. Like a person’s eyes or face if you’re shooting a portrait. If you do this, you can shoot multiple shots with a consistent exposure and focus, such as in a photo shoot and the model isn’t moving too much.
Other controls appear at the top of the screen, on either side of the Dynamic Island (one of our favorite features on the iPhone 14 Pro phones), when using the camera app. You’ll see controls for the flash and toggles for the Apple ProRAW setting and Live Photo, which creates a little three-second movie out of the photo, which you can see when you press and hold on the photo in the Photos app on your phone.
There’s also a small carrot arrow in the center of the top bar that you can tap to reveal more controls. Do so, and you’ll see a bar below the picture frame where you can access flash control, night mode (which appears only when it’s dark), Live Photo toggle, exposure control, a timer, and filters. The filters haven’t changed since earlier iPhones, and here you’ll find our old favorites, vivid (warm and cool varieties), dramatic, (again, warm and cool), and three types of black and white filters.
Video recording is equally feature-packed. When you switch to video mode, you’ll see the resolution and frame rate in the upper right corner, which you can change with a tap. You might want to change this if you want to shoot at 60 frames per second (if you want a smooth video) or at 30 or 24 fps (which emulates cinema film). You’ll also see how much time you can record below the carrot arrow in the center if you’re shooting with Apple ProRes. If you’re shooting at high resolutions, like 4K, which will eat up a lot of storage space, you might also see a “free resources” text button, which will move some of the old photos and videos on your phone to your iCloud storage account if there is an internet connection.
Apple says 1 minute of HDR ProRes video shot at 1080p resolution is 1.7GB and a whopping 6GB at 4K resolution. I hope you splurged on more storage space when you upgraded your phone. Indeed, if you have a 128GB 14 Pro or Pro Max, you’re limited to only recording ProRes at 1080p at 30fps or lower.
Finally, there’s also the light control, which turns the on-camera flash on or off, and the new Action Mode, which stabilizes your shaky videos. It works well, and aspiring cinematographers can almost forgo an expensive external gimbal when keeping up with pets, kids, or other active subjects. You can’t shoot in full 4K resolution in Action Mode; you’re limited to “only” 2.8k, and there’s a slight crop to the image, which is necessary to stabilize the image.
After you’ve captured the photo or video, you may be anxious to make it look great. But you might be initially disappointed in what you get shooting ProRAW. They often look a little low in contrast or even dim. But, thanks to the vast amount of data captured in the 48 megapixel image files, you’ll be able to do some serious image magic.
You can do all this on your phone by going into the Photos app and tapping the “Edit” button in the upper right corner of the screen. A line of controls that you can scroll left and right will show up under the photo. The first of these is the “Auto” setting, which will apply automatic adjustments to the photo based on some pretty advanced computational magic going on inside the phone. If you want to make your own adjustments, the main settings you’ll want to use are exposure, highlights (bright parts of the picture), shadows, contrast, brightness, and vibrance.
Exposure will lighten and darken the whole photo. Highlights will do the same for bright areas, such as clouds, while shadows adjusts, well, shadows. Contrast is what it sounds like. Brightness also adjusts how light or dark an image is, similar to exposure, but it tends to make darker photos more saturated and increases contrast. Vibrance is similar to Saturation, which I don’t personally use, but it brightens colors a little more realistically. Turning down Vibrance mutes colors and can give them an aged photograph look.
Look at the two photos below — a typical image I captured with the 14 Pro Max — to see what you can do with ProRAW. The one on the left is unedited. It’s dark and doesn’t have much pop. The one on the right has the shadows brightened, the highlights brought down, and the color and contrast were auto-adjusted. This is a perfect example of the advantage a 48-megapixel sensor has over my previous iPhone 12 Pro.


The iPhone 14 Pro and Pro Max are fantastic cameras, allowing photographers to capture more light, with more detail, at a higher resolution than ever before. Note that I didn’t say iPhone photographers. I’ve been shooting for a long time, and I love my Nikon DSLR. But it’s a big, imposing camera. It weighs a lot, I have to juggle multiple lenses, and it’s frankly getting a little old. My iPhone is smaller, faster, shoots video better than my Nikon ever will, and is always with me, making it — by definition — the best camera I own.
Will it replace a professional kit like the $6500 Nikon D6? No, of course not. But that’s a camera for sports and conflict photojournalists or fashion photographers. For the advanced enthusiast who can take some good photos but doesn’t make their living from photography, the iPhone 14 Pro line is the first one I felt comfortable taking as my only phone on a major trip.